Friday, June 30, 2017
29 June 2017 - Hood
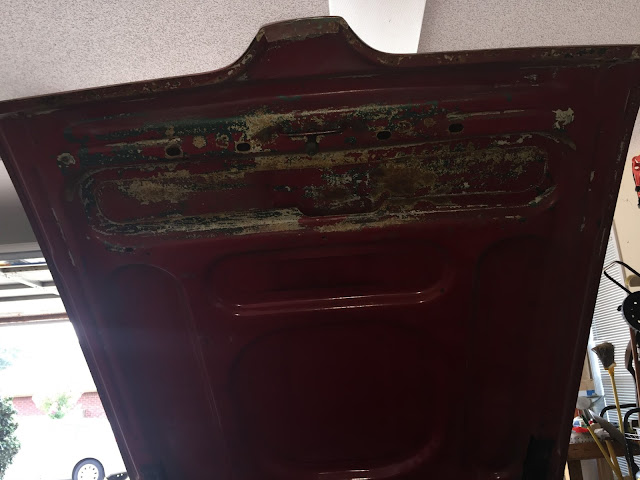
I painted another coat of rust encapsulator on the underside of the hood. It is now completely painted with chassis saver. I was unable to paint the inside of the structural areas of the hood. I purchased a rattle can of rust inhibitor/encapsulator and I will spray those areas.
Thursday, June 29, 2017

Tuesday, June 27, 2017

Saturday, June 24, 2017
24 June 2017 - Corrosion Control - Hood
Today I painted more of the Chassis Saver product on the under side of the hood. I scuffed the paint in places that needed to be repainted and put two thin coats down. I am considering buying a product from eastwood that is similar to chassis saver, but it come in a rattle can and has an extension to allow access into areas unreachable with brushes.


Saturday, June 17, 2017
17 June 2017 - Corrosion Control - Hood and trunk
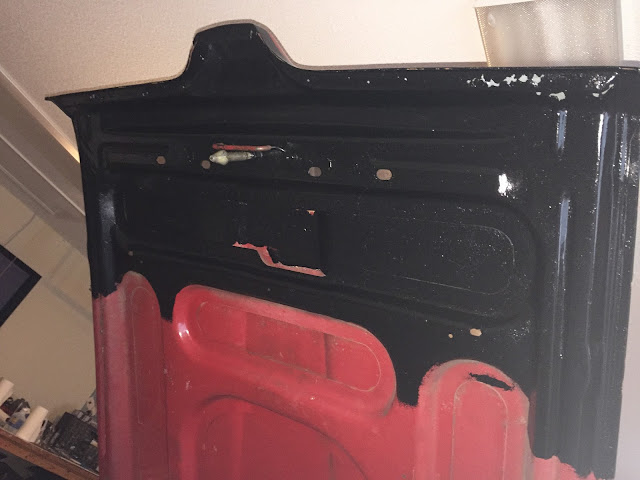
Today I cleaned up a couple areas in the trunk and cleaned up the top 1/3 of the engine hood(engine side). I bought a product called chassis saver. It had good reviews on youtube and I watched a gearhead show that used the product.
I painted the prepped trunk and hood areas with the chassis saver. I will let it dry overnight and see how that goes. Instructions indicate it can be re-painted in 3-6 hours depending on humidity. But I will wait until tomorrow.


I painted the prepped trunk and hood areas with the chassis saver. I will let it dry overnight and see how that goes. Instructions indicate it can be re-painted in 3-6 hours depending on humidity. But I will wait until tomorrow.


Wednesday, June 14, 2017
14 June 2017 - Rear Lighting - light upgrade
After receiving a sample of an LED for the rear brake lights from WCCC, I finally ordered a six pack to replace all of the rear brake lights with LEDs.
During the daylight the LEDs are very bright. - Taken at about 5:45 pm


During the night at about 8:20 pm


During the daylight the LEDs are very bright. - Taken at about 5:45 pm


During the night at about 8:20 pm


Tuesday, June 13, 2017
13 June 2017 - LED interior lighting Revisited
Years ago, about 6-8 years or so, I made LED lamps for the interior of the car. I bought a variety of bright white LEDS from Digi-key, as well as the resistors needed to tune in the voltage/current for the lighting circuits. I also used failed incandescent bulbs used in the interior lights(instrument dash, door panels and dash floor).
Here is a blog posting from one of my project blogs;
http://myprojectsandstuff.blogspot.com/2013/11/67-mercury-cougar-incandescent-to-led.html
There are a few details as to what I did that includes a couple of diagrams.
Basically what I did was use the failed incandescent bulb to install the LEDs and resistors. The process required removing the glass bulb from the socket(Dremel tools), and clean up the interior bulb base to allow for soldering LEDs and resistors.
I made LED modules for the front dash, driver and passenger sides. The LEDs have worked flawlessly since they were made.
I am considering making a new batch of LEDS, but I am looking into the better(expensive) LED lighting technology.
SIDE NOTE:
I recently found on the internet, cheap white LED lights that could be used for interior lighting. They are made from low quality components because 3 LED lights have now failed.
Monday, June 12, 2017
12 June 2017 - Rear Brake/running lights
I ordered a six pack of LED lights( from WCCC) to replace the rear brake/lights. I have installed LEDs from 3 different sources. The one that is the brightest is the one from WCCC. Should get them in this weekend.
Sunday, June 11, 2017
11 June 2017 - Coolant Overflow tank
I use the washer fluid reservior as a coolant recovery tank. It is working out pretty good so far. Today while I was checking a few things under the hood I noticed that there was a layer of rusty colored film on one side of the container. I flushed the container and added distilled water. Need to keep an eye on that to see what is going on with it.
11 June 2017 - Rubber plug kit
I ordered a rubber plug kit from WCCC. It has 33 rubber plugs for the various locations of the body/frame of the Mercury Cougar.
The parts bag does have a list of the areas that the plugs should be installed.
So far I have installed 5 plugs.
The parts bag does have a list of the areas that the plugs should be installed.
So far I have installed 5 plugs.
Saturday, June 10, 2017
10 June 2017 - Holley Carb throttle linkage
Today I drove The Merc on a test drive.
The changes I made, adding a second throttle return spring and greasing the throttle pedal connections and throttle linkage connections, seemed to have cleared up the floating idle issue.
The Merc is running much better now...
The changes I made, adding a second throttle return spring and greasing the throttle pedal connections and throttle linkage connections, seemed to have cleared up the floating idle issue.
The Merc is running much better now...
Friday, June 9, 2017
9 June 2017 - WishList
Upgrades to The Merc...
- Brake System - convert brake system from 4 wheel power drum to 4 wheel manual disc
- first convert power brake system to manual brake system(Open Tracker Racing)
- replace front drum brakes to disc(Open Tracker Racing)
- replace rear drum brakes to disc(Open Tracker Racing)
- convert to a manual rack and pinion system(Unisteer)
- Rear Suspension - replace factory original components with new components
- stay with leaf springs
- upgrade to performance leaf springs/shackles/poly bushings
- Overhead Console - use a mustang overhead console 67-68
- Homelink GarageDoor Transmitter (embedded in sun visor)
- Modern Ford 3G alternator
- BMW 7-Series Electrochromic (Auto-Dim) rear view Mirror
Thursday, June 8, 2017
8 June 2017 - Holley carb - slow to return to idle
The engine is slow to return to idle. All of a sudden this is happening. I checked the ported vacuum can of the distributor and its working. I also checked the springs under the rotor and they are intact and the weights move as they should. I found that the stops are small silver and the two springs are blue. I checked the basic setup on the 8479 distributor and its supposed to have silver heavy springs. Sooo I have changed that some time in the past and I cant remember doing that. I ordered a spring kit for this distributor and will things back to stock settings.
At the intake manifold I checked the vacuum hoses for the power brakes and the transmission modulator and they check good, no leaks. I need to check the vacuum hose connection for the vacuum modulator at the transmission and make sure that is not leaking.
If none of those are the problem, I will disconnect those hoses and cap and then check the idle. Plan is to eliminate all vacuume connections. If after all of that, then I need to take a look at the carb itself.
UPDATE:
I took a look at the new linkage I put together to replace the original. The replacement has a mild carbon steel 1/4 rod threaded on each end with heim joints(rod ends). This linkage is considerably heaver than the original but its also very sturdy. I ended up adding another throttle return spring. So now there are two springs, a smaller one nested inside a larger one. That additional spring is what I should have had all along. I also greased the pedal throttle linkage at the firewall location(looks likes it has never been done before). Tomorrow when I get the chance I will start the engine and check to see if these latest changes were effective.
8 June 2017 - throttle linkage
Finally modified the throttle end of the linkage by removing 3/4" of the bolt so it at least looks better.
The linkage still needs to be painted.
The linkage is very easy to remove/install, and only requires two 7/16" wrenches.
The linkage still needs to be painted.
The linkage is very easy to remove/install, and only requires two 7/16" wrenches.
Sunday, June 4, 2017
4 June 2017 - Holley throttle linkage
Finished the initial fabrication of the linkage assembly. Tested it today and it works, no binding or issues at this time.
The linkage needs to be painted/coated. The carb throttle linkage end needs to be cleaned up and finalized. Currently there is a bolt that is about a half inch too long.
The throttle pedal end of the linkage is adjusted and set.


The linkage needs to be painted/coated. The carb throttle linkage end needs to be cleaned up and finalized. Currently there is a bolt that is about a half inch too long.
The throttle pedal end of the linkage is adjusted and set.
Photos before - stock linkage


Photos after - custom linkage assembly


Saturday, June 3, 2017
3 June 2017 - Holly Carb throttle linkage
I picked up some parts to put together a throttle linkage for the holley carb. The ford factory throttle linkage is working just fine, but the one I am making will allow for more flexibility, allowing me to install other carbs. Also the custom linkage will allow more freedom of movement in the right places.
I am considering making the linkage using an aluminum rod. It will be very light and hopefully strong enough for this application.
I have cut a steel rod to the proper length and threaded one end(1/4-28) and installed a rod end. It is alot heavier than I thought it would be and may be too heavy for this application. I am going to finish the other end and install a rod end. I do know the steel rod linkage will be more than adequate for this application.
So basically I will make an aluminum rod assembly and a steel rod assembly and see how I like the results.
===================
The throttle pedal linkage has a hole that is .4990".
The width of the throttle linkage is .38".
There is a rubber insert that fits into that hole. The rubber grommet has a hole that is 3/16".
The rod that connects from the throttle pedal at the grommet is 3/16" diameter. The other end of the rod connects to a 3/16" hole on the holley carb.
So the plan is to put a 1/2" diameter by .4" insert in the throttle pedal hole. Then use a 2" piece of 1/4" rod that will
Subscribe to:
Posts (Atom)