I wasn't sure of the size of the fuel line. Used a micrometer and found out the tube/line size is 5/16". The fuel lines fore and aft appear to be okay.
I need to check on the fuel line size on the output side of the fuel pump. I am thinking about running a metal fuel line from the fuel pump to the carb. I think I will elimate the rubber hosing altogether.
Sunday, November 27, 2016
27 November 2016 - Brake System
The brake system appears to be leak free at this point. I'll check for leaks tomorrow. If everything looks good, I will begin preparations for engine/transmission installation.
27 November 2016 - Brake System
I finished making the last line(runs from the distribution block to front brake system port on master cylinder). It didn't take long to make, about an hour to form and terminate both ends. The problem I was having was that every time I did a double flare on the factory pre bent lines, the double flare was damaged in some way. I ditched the factory pre-bent line and used a piece of line( bought a 25' coil of 3/16" brake line) and was able to properly terminate the line with double flares. So something about the pre-bent lines is odd. Maybe its too brittle after being worked with the tool I used.
Last thing to do now is install that last line, and start bleeding the brake system/check for leaks...
The brake line from the distribution valve to the master cylinder front brake port has been made and installed.
All lines are installed now, and the entire brake system has been bleed, but only once so far. While bleeding the brakes there were leaks that were addressed. Currently there are no more leaks and the brake system has fluid.
Here a few image of the replacement brake lines. I didn't take any images of the rear axle to front brake line...will do that later.
 |
| Here is a union that I replaced. The original brake lines had this union in place so I made sure to duplicate that...its needed to do a service replacement of the passenger side front brake hard line. |


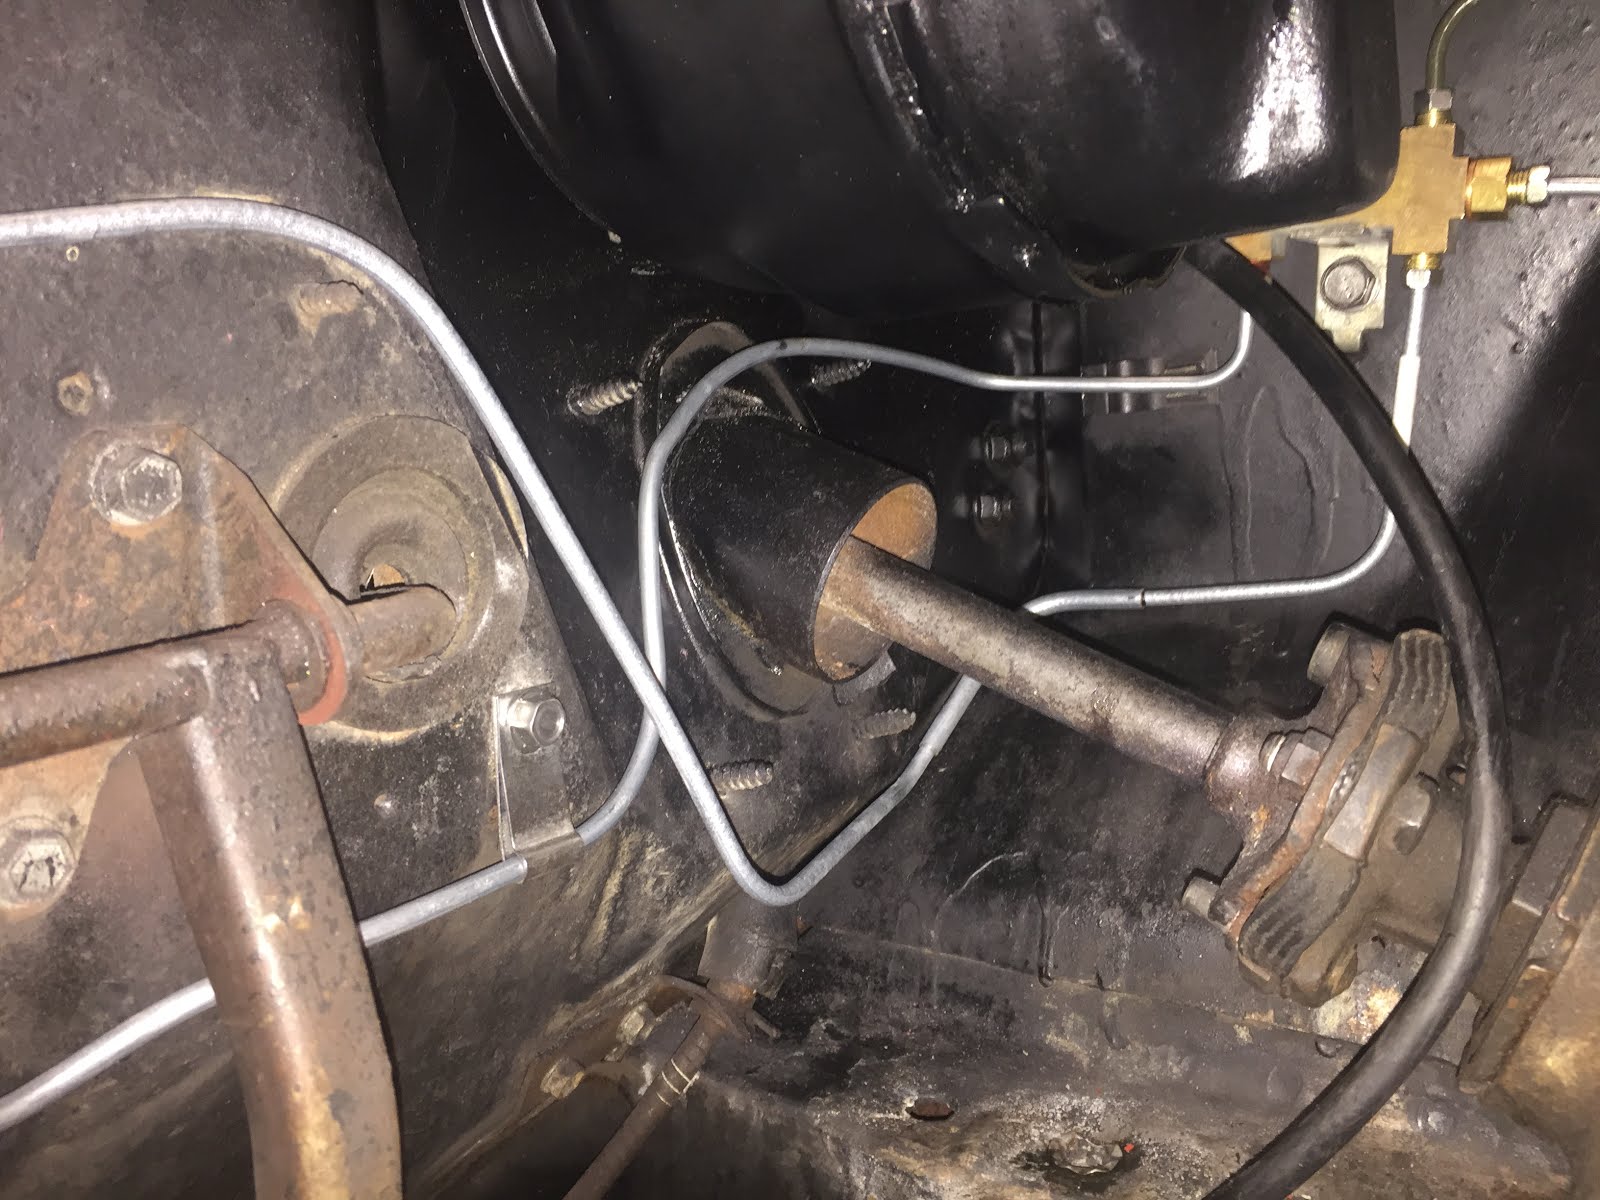 |
| In this area the brake line that is above the steering column shaft, is the line that runs from the rear axle to this location. The brake line that routes under the steering column shaft runs from the passenger side front brake line to this location. |

 |
| The green color coated brake line is a custom line I had to make, the one in the pre-bent kit was too short. |
Saturday, November 26, 2016
26 November 2016 - Brake System
I spent a considerable amount of time adjusting the rear axle to front brake line so that it was straight enough to compare with the old line. Once it was straightened out, I found out that each end of the line did not match the original. So I made course adjustments and then started the process of installing the line.
The special clips for mounting the hard line to the chassis along the transmission tunnel were bigger than the originals. So I had to rework the clips so that they wrapped around the brake lines to properly secure the brake line. The rework of the clips required shortening the clip length and drilling another mounting hole in the metal piece. It took about 1.5 hours to just to get those clips so they worked and looked like the originals.
After that, the front part of the line had to be adjusted to fit in place. This particular line did not match the original at all(well the length was at least right). The line required alot of rework at both ends.
The front part of the line was supposed to route underneath the steering column shaft. What I ended up doing was routing it above the steering column shaft.
The next line installed was the front one that connects the passenger side brake line to the distribution block. That line was very close to the original and was pretty easy to put in place and install.
Currently front and rear brake lines are connected to the distribution block and tightened.
There are two lines left to install. These are the lines that connect the distribution block to the master cylinder.
I was able to install the line that connects the distribution block to the rear brake port on the master cylinder.
The remaining line has been a PITA. I made a line that fit and when I terminated it, the double flare was damaged during the process. So I have to make another line....
Hoping to get that line done then bleed the brakes and check for leaks tomorrow.
Friday, November 25, 2016
25 November 2016 - Brake System
I connected the driver side front brake line to the distribution block and tightened it.
I started straightening out the long brake line that runs from the rear axle to the front. So far it is straightened out and I am working on getting the line to look more like the old line. After I get that line installed, I am considering removing the master cylinder and bench bleed it. Then I believe it will be much easier/quicker to bleed the entire brake system.
I started straightening out the long brake line that runs from the rear axle to the front. So far it is straightened out and I am working on getting the line to look more like the old line. After I get that line installed, I am considering removing the master cylinder and bench bleed it. Then I believe it will be much easier/quicker to bleed the entire brake system.
25 November 2016 - Brake Tool
I realized after purchasing a pre-bent brake line kit that I would need to create custom brake lines. The pre-bent kit has some lines that are almost the correct length and others that are an exact fit.
When making replacement lines I am not too concerned with making lines that are the exact shape of the originals, only that they fit and are not in the way of the suspension components, the transmission or the exhaust components.
So brake line forming tools that I bought at the local auto parts stores work just fine for what I need. However the brake line flaring tools available at these stores are low quality and kind of a PITA to get consistent double flares. After trying all of the ones available locally, I started searching online for the tool that I thought would work.
My searches ended at the Eastwood website. They have a tool that is portable, can be used on the car or in a vise and is for 3/16" brake lines. So I bought the tool and after using it for about 30 minutes to get familiar with it, creating double flares on 3/16" brake lines is extremely easy to do as well as getting consistent results.


Sunday, November 20, 2016
20 November 2016 - Brake System
Finished installing the hard lines on the rear axle. I think I have them properly installed. The flex line from the rear axle to the mounting point is not completely in place. I am waiting on parts from NPD and Summit to finish installing that part.
I installed the distribution block in the engine bay, its taped/covered to keep it clean while I install the brake lines to it.
I installed the distribution block in the engine bay, its taped/covered to keep it clean while I install the brake lines to it.
I ordered a brake line 3/16" flaring tool from Eastwood. I have tried the ones sold in the auto parts stores but I was unable to make proper flared ends consistently.
Friday, November 18, 2016
18 November 2016 - Brake System
Since its looking like I will have to make some custom lines for the brake system, even though I ordered a complete brake line kit, heres some info about the brake lines and fittings:
FYI stuff:
All brake hardlines have been removed from the car. The rear axle flex hose was in very bad shape. After removing that flex hose I cut it open to find this;
I have ordered a 25' coil of brake line and brake line mounting hardware, and brake line nuts in 3/8" and 7/16" sizes. I also ordered a rear axle vent kit and rear axle vent fitting. Those parts will be in some time next week.
Any of the removed hard lines that had mounting brackets/clips have been removed and are now soaking in Evapo-Rust.
FYI stuff:
- brake line outer diameter is: 3/16"
- brake line fittings used on 3/16" line is: 3/8"-24 and 7/16"-24
- interconnector size: 5/8" long x 1/2" wide with 3/8"-24 thread sizes
All brake hardlines have been removed from the car. The rear axle flex hose was in very bad shape. After removing that flex hose I cut it open to find this;
 |
| Cross section of rear axle flex hose...40+ years of service |
I have ordered a 25' coil of brake line and brake line mounting hardware, and brake line nuts in 3/8" and 7/16" sizes. I also ordered a rear axle vent kit and rear axle vent fitting. Those parts will be in some time next week.
Any of the removed hard lines that had mounting brackets/clips have been removed and are now soaking in Evapo-Rust.
Thursday, November 17, 2016
17 November 2016 - Brake System
I was looking at how the brake line that runs from the rear axle to the distribution block up front is fastened to the body. Looks like there are only two clips that hold the line in place. I was trying to carefully remove those clips but I managed to mess them up. I do have replacement mounting clips, hopefully they will install in the same holes without issues. If not I'll have to figure out a way to mount the lines which is no big deal, stock mounting would be preferred though.
Right now the rear axle hard line fittings are soaking(PB B'LASTER). I'll keep hitting them with the stuff until I get a chance this weekend to work on removing/replacing them.
Right now the rear axle hard line fittings are soaking(PB B'LASTER). I'll keep hitting them with the stuff until I get a chance this weekend to work on removing/replacing them.
Wednesday, November 16, 2016
16 November 2016 - Brake System
Continued with installing the front brake system hard lines. So far both front wheel wells have the hard lines installed. Looking at the remaining hard lines for the front brakes indicates that all of the hard lines will have to be adjusted for proper fit to the engine bay and the distribution block.


Tuesday, November 15, 2016
15 November 2016 - Brake System
The brake parts arrrived today from WCCC.
I ordered a complete OE steel brake line kit, which is all hard lines for front and rear brakes. I also ordered brake line mounting hardware, a distribution block seal kit, and a tool to prevent the piston/valve in the distribution block from moving while bleeding the front and rear brake systems.
I installed the replacement seals on to the piston/valve for the distribution block and then installed the piston. Everything went together like it should, I set aside the distribution block until I can remove and install the front and rear brake hard lines.
I installed the passenger side wheel well front steel line. I did not have to remove the wheel/tire to put in the line. I noticed during installation that the steel line shape was off in several places and had to be adjusted to fit like the original.
I noticed that all of the new steel lines terminate much lower than the original lines at the distribution block.
I attempted to install the driver side front wheel well steel line. I ran into a problem with space/clearance due to the wheel/tire. I did not have time to jack the car up to remove the wheel today.
Saturday, November 12, 2016
12 November 2016 - Brakes
Today I cleaned up the distribution block and spool valve. I picked up a brush kit that is used to clean passages in an engine/transmission.
After about ten minutes of using the various brushes the distribution block looked pretty clean! The valve cleaned up well too.
As soon as the parts arrive from WCCC, I can start getting the brake system back together and fully functional.
ToDo:

After about ten minutes of using the various brushes the distribution block looked pretty clean! The valve cleaned up well too.
As soon as the parts arrive from WCCC, I can start getting the brake system back together and fully functional.
ToDo:
- rebuild distribution block assembly
- install rebuilt distribution block
- install replacement steel brake lines - front and rear
- install rear flex hose assembly
- bleed brake system - use brake distribution switch tool to lock in spool valve.
Distribution block cutaway view

Friday, November 11, 2016
11 November 2016 - Brake system - Distribution Block Disassembly
I removed the distribution block from the brake system. The valve in the distribution block was stuck. I thought I would try a different way of removing the valve. I bought some bolts so that I could plug all holes except for two, and I bought an adapter that allows the grease gun fitting to be connected to the distribution block. It took a couple of hours of driving around town to find the correct bolts and adapter. After putting the pieces in place, it took about 2 minutes to pop out the stuck valve!!! Now the distribution block and valve are soaking in brake fluid. I need to pick up some brushes to clean the distribution block bore. And after that is done, and the rebuild kit comes in,
the distribution block should be as good as new.


the distribution block should be as good as new.

To use a grease gun to remove the spindle valve from the distribution block, obtain the following parts;
- four bolts that are 3/8"-24 fine thread and one 5/16" to 1/4" adapter(grease gun to distribution block port).
- Wrap all fittings with enough teflon tape so that the bolts thread in securely. Also when installing all fittings do not overtighten. Only thread bolts/fittings in until they bottom out. If the bolts/fittings are overtightened it will damage the ports.
- Remove the "Left Front Brake" fitting on the distribution block, move it to either the "Front Master Cyl" 7/16" port or the "Rear Brakes" 7/16" port.
- In that 3/8" Left Front Brake fitting, install one 3/8"-24 fine thread bolt.
- In the "Front Master Cyl" 7/16" port or "Rear Brakes" 7/16" size port, install the 5/16" to 1/4" adaptor for the grease gun connection.
- In the "Brake warning switch" port install one 3/8"-24 fine thread bolt.
- In the "Rear Master Cyl" port install one 3/8"-24 fine thread bolt.
- In the "Right Front Brake" port install one 3/8"-24 fine thread bolt.
- The "Left Front Brake" port is the only open port, and will be the port that the internal valve will exit.
- Attach the grease gun hose to the newly installed adapter on the distribution block. Pump the grease gun a couple of times and then the internal valve should easily slide out.


Monday, November 7, 2016
7 November 2016 - Brake System
Contacted WCCC because I had a question or two about the brake problems I discovered. After describing the problem( when pushing the brake pedal with normal pressure, the front reservior of the master cylinder shoots a stream of fluid, but the rear reservior does not), the determination was that the distribution block valve is stuck. Recommendations were to made to replace the seals in the distribution block and clean up the internals of the distribution block. So I ordered a seal kit for the distribution block and a tool to help with bleeding the brakes.
Also ordered a complete OE steel brake line kit(all steel brake lines front/rear/rear axle), and a fastener kit for the brake line kit.
Currently all of the hard lines, connections and the distribution block are soaking with PBlaster. Hopefully in a couple of days when the parts arrive, things will loosen up a bit.
Sunday, November 6, 2016
6 November 2016 - Brake system
While working on the rear brake system I noticed the rear brake flex hose needed replacement. I bought a replacement hose BH36603 BrakeBest brand. I didn't realize how dirty and oil covered the hose and mounting locations had become over the years. I bought a couple cans of brake cleaner and that cleanup the rear flex hose connections and mounting point.
Currently all connections of the rear flex hose are soaking with PBlaster. I was able to loosen one connection(the passenger side hard line to the wheel cylinder) but the other two are not moving. I will try again later today. I my end up just replacing all of the hard lines in the rear brake system back to the distribution block.
Well, I kinda messed/damaged/fubar the fitting of the brake hardline for the rear axle driver side, and the fitting of the hard line that runs from the rear axle to the distribution block up front. Tomorrow I will look into replacement parts.
Saturday, November 5, 2016
5 October 2016 - Brakes
I continued working on the brakes, the passenger side rear wheel cylinder has been replaced.
Both rear brake drums have been turned and new brake shoes, brake hardware have been installed.
Front and rear brake systems have been bled
Now, all wheels have new wheel cylinders, brake shoes and brake hardware. The front driver and passenger side flex hoses have been replaced.
Discovered that the front brake reservoir(rear brakes) shoots fluid out of it if the brake pedal is pushed hard. The rear reservoir(front brakes) does not do that at all.
Tomorrow I need to find the proportioning valve. Its supposed to be near the rear axle, above on the body near the hardline in the area where the axle brake flex hose is located.
(FYI - 1967 Mercury Cougar power drum brake system does not have a proportioning valve)
Todo;
Both rear brake drums have been turned and new brake shoes, brake hardware have been installed.
Front and rear brake systems have been bled
Now, all wheels have new wheel cylinders, brake shoes and brake hardware. The front driver and passenger side flex hoses have been replaced.
- rear axle flex hose needs to be replaced
- distribution block needs to be replaced or rebuilt
Discovered that the front brake reservoir(rear brakes) shoots fluid out of it if the brake pedal is pushed hard. The rear reservoir(front brakes) does not do that at all.
Tomorrow I need to find the proportioning valve. Its supposed to be near the rear axle, above on the body near the hardline in the area where the axle brake flex hose is located.
(FYI - 1967 Mercury Cougar power drum brake system does not have a proportioning valve)
Todo;
install driver and passenger side tie rod assembliesinstall idler arminstall coil springs - driver & passenger sideinstall coil spring covers- driver & passenger sideGrease all suspension points/ball joints- install front sway bar - partially installed, will finish when full weight is on suspension
install wheel/tires(tire shop has both front rims and will install new tires by 1 Nov 2016. Tires are Cooper Cobra 235/60r14.on the driver side, tighten lower control arm eccentric eliminator bolt(do not torque until engine/transmission is installed)on the passenger side, loosen but make sure its tight, the lower control arm eccentric eliminator bolt.lower vehicle - all four wheels on the groundinstall brake power booster/master cylinder assemblyinstall front driver side and front passenger side brake flex hosesmanually adjust front drum brakesinstall power boosterinstall master cylinderbleed brake system- try to do some kind of front end alignment so car is driveable...
Thursday, November 3, 2016
3 November 2016 - Brake system
- Connected the front and rear brake system lines to the master cylinder
- started bleeding the front brake system, did not have time to do the rear brake system today.
Todo;
install driver and passenger side tie rod assembliesinstall idler arminstall coil springs - driver & passenger sideinstall coil spring covers- driver & passenger sideGrease all suspension points/ball joints- install front sway bar - partially installed, will finish when full weight is on suspension
install wheel/tires(tire shop has both front rims and will install new tires by 1 Nov 2016. Tires are Cooper Cobra 235/60r14.- on the driver side, tighten lower control arm eccentric eliminator bolt(do not torque until engine/transmission is installed)
- on the passenger side, loosen but make sure its tight, the lower control arm eccentric eliminator bolt.
lower vehicle - all four wheels on the ground- install brake power booster/master cylinder assembly
install front driver side and front passenger side brake flex hosesmanually adjust front drum brakesinstall power boosterinstall master cylinder- bleed brake system
- try to do some kind of front end alignment so car is driveable...
Wednesday, November 2, 2016
2 November 2016 - Brakes
Installed the brake booster and master cylinder. Did not connect brake system to master cylinder, will do that tomorrow.
Todo;
Todo;
install driver and passenger side tie rod assembliesinstall idler arminstall coil springs - driver & passenger sideinstall coil spring covers- driver & passenger sideGrease all suspension points/ball joints- install front sway bar - partially installed, will finish when full weight is on suspension
install wheel/tires(tire shop has both front rims and will install new tires by 1 Nov 2016. Tires are Cooper Cobra 235/60r14.- on the driver side, tighten lower control arm eccentric eliminator bolt(do not torque until engine/transmission is installed)
- on the passenger side, loosen but make sure its tight, the lower control arm eccentric eliminator bolt.
lower vehicle - all four wheels on the ground- install brake power booster/master cylinder assembly
install front driver side and front passenger side brake flex hosesmanually adjust front drum brakesinstall power boosterinstall master cylinder- bleed brake system
- try to do some kind of front end alignment so car is driveable...
Tuesday, November 1, 2016
1 November 2016 - Front Suspension
I picked up the front rims/tires from the auto shop today. The tires installed are Cooper Cobra 235/60R14.
I installed the brake flex hoses for each front wheel cylinder.
I installed the wheels and then lowered the car to the floor. And noticed that the toe in is waaaay off. Tomorrow I will adjust the toe-in and then move on to brakes if there is time. The power booster needs to be installed and so does the master cylinder and then the brakes need to be bled.
Todo;
I lined up the idler arm with the frame to kind of square things up with the centerlink and pitman arm of the steering box. After doing that, these images show the toe-in.


I installed the brake flex hoses for each front wheel cylinder.
I installed the wheels and then lowered the car to the floor. And noticed that the toe in is waaaay off. Tomorrow I will adjust the toe-in and then move on to brakes if there is time. The power booster needs to be installed and so does the master cylinder and then the brakes need to be bled.
Todo;
install driver and passenger side tie rod assembliesinstall idler arminstall coil springs - driver & passenger sideinstall coil spring covers- driver & passenger sideGrease all suspension points/ball joints- install front sway bar - partially installed, will finish when full weight is on suspension
install wheel/tires(tire shop has both front rims and will install new tires by 1 Nov 2016. Tires are Cooper Cobra 235/60r14.- on the driver side, tighten lower control arm eccentric eliminator bolt(do not torque until engine/transmission is installed)
- on the passenger side, loosen but make sure its tight, the lower control arm eccentric eliminator bolt.
lower vehicle - all four wheels on the ground- install brake power booster/master cylinder assembly
install front driver side and front passenger side brake flex hosesmanually adjust front drum brakes- bleed brake system
- try to do some kind of front end alignment so car is driveable...
I lined up the idler arm with the frame to kind of square things up with the centerlink and pitman arm of the steering box. After doing that, these images show the toe-in.


Subscribe to:
Comments (Atom)