Search This Blog

Sunday, September 30, 2018

30 Sept 2018 - sudden shutdown issue - cont'd

So I just finished removing the instrument panels/dash assemblies to get to the ignition switch and under dash wiring.  I removed the ignition switch and did continuity checks per the service manual and the switch checks out.  Also took a closer look at the ignition switch "pigtail" connector.  Each connection to the ignition switch is tight and secure.  So I went into the engine bay and started at the starter motor relay.  The "S" terminal and "I" terminal connectors were loose but still making contact.  So I went head and cleaned the connectors and "adjusted" them so they would very snug to the terminals.  Took the car for a test drive and did not have issues during this session, so I still need to keep driving and waiting.


30 Sept 2018 - carb stuff

Today I adjusted the accelerator pump cam to #2 position.  This latest 1850 carb has some slight differences compared to the one I bought in 2002.

Hmm, honestly can't tell the difference between pump cam position 1 and 2, so for the moment I will leave it at #2.

When I step on the throttle and it drops down into 2nd, there is a momentary bog(VERY slight) and then acceleration happens much quicker...

I need to check to see if the vacuume secondaries are actually working.  I will try the paperclip trick either today or tomorrow.

Currently the secondary spring is now the stock "plain" spring.


Saturday, September 29, 2018

29 Sept 2018 - carb changes

The holley 1850 that I have installed did not have a quick change spring kit.  So I removed the one I have on another 1850 and installed it on the new carb.  The default secondary spring for an 1850 is the "plain" spring.  I put a "purple" spring in and will test drive to see which way I need to go with the springs.

29 Sept 2018 - spare parts - headlight door hinges

Thursday of this week I ordered driver and passenger side headlight door hinges.  I thought I had headlight doors that had the hinges but I do not.  So when the parts arrive I will clean and prep and use them to make complete door cover assemblies.


Sunday, September 23, 2018

23 Sept 2018 - MSD distributor 8479 - advance spring change out

Stock advance springs are two heavy silver springs, and the advance stop is blue.

Today I changed the advance springs; 1 light silver and 1 heavy silver.  The advance stop is still the blue one.  Will drive it this way and see if I like this...also had to change the static timing because of these spring changes...

23 Sept 2018 - engine shutdown cont'd

Yesterday and today I removed the after market Sun tach from the electrical system.  I am in the process of eliminating potential causes.  The only othe non stock addition to the electrical system is the voltmeter.  That may be next depending on how all of this goes up to this point.

Wednesday, September 19, 2018

19 Sept 2018 - ignition issues / sudden shutdowns

Today while testing the driveability, due to disconnecting the vacuum advance, the car just completely shutdown as if a button was pushed.   It did that twice during the testing.  So I prematurely ended testing to make sure I could get back to the shop and check into what is happening.

Two things to troubleshoot now; 1) the ignition misses 2) sudden engine shutdowns.

Since the engine seemed to run very well without the MSD vacuum canister connected, I will for the short term keep it disconnected while I work on problem two.

I disconnected the battery today and parked the car such that I can get better access to the ignition switch and dash areas.  Tomorrow I will be removing the dash panels and pieces/parts.

Sunday, September 16, 2018

16 Sept 2018 - valve adjustments - distributor timing

I thought I would check the valves and distributor timing today.

I statically set the timing to #1 cylinder TDC, 0 degrees at the dampener.  The distributor was off a couple of degrees, corrected that and then started the process of checking the rockers.  I removed the distributor cap and wires, then both valve covers.  I had an old MSD distributor cap, so I used that to help me see which plug the rotor is lined up with while I turn the crank.  I also marked the dampener in 4 spots starting from 0 degrees.  The distance between each mark is 5.1 inches.  So by doing that I can start at #1 cylinder 0 degrees TDC, check/set the torque for the intake and exhaust valves, then move through the firing order and going to the next mark on the dampener.  Doing that means I cut down on the time going through the timing cycle.


Pulled plug #1 so that I could install the TDC whistle I made.  I guess plug #1 looks okay


Here is the TDC whistle I made....its part of a rifle shell casing and part of a spark plug.


passenger side just before adjustments

There is the old distributor cap, cut to show the rotor location while checking the rockers

driver side just before adjustments

Wednesday, September 12, 2018

12 Sept 2018 - headlight doors

I recently purchased a couple of headlight covers.  They are complete units.  But the door hinges are in fair shape.  I didnt relealize while cleaning them up, that one of the hinges is missing a bushing.  And one of the hinges has been reworked extensively.  Since the pieces were painted in many coats of paint the details were not revealed until after removing the paint.  So I now see that both hinges cannot be used for my car.  I have been working on cleaning them up and then painting them to put aside for some time in the future.  The headlight covers are in good shape and can definitely be used on my car.  So I have started working on cleaning those up and prepping for use.

Sunday, September 9, 2018

9 Sept 2018 - spare parts

I purchased a few spares in the last couple of months but did not have the time to clean them up.

So I worked on cleaning up the L&R headlight doors and the L&R rear tailght assemblies.

The headlight doors are a "matched" set.  But they are from different years.  The driver side door is 68' and the passenger side is 67'.  Thats not a big deal to me, as long as they work for what I will do with them.

The all pieces of the rear taillight assemblies are 67'.

I did a basic cleanup of all of the pieces so that I can at least put them in the house or in the garage.


9 Sept 2018 - headlight alignment

Well I think I have the headlights adjusted per the service manual.  Now its time to take it out for a night time road test.  Weather permitting, I'll do that this evening.

9 Sept 2018 - headlight beam alignment

While aligning the headlamps today, the passenger side low beam; horizontal adjuster "popped".  I had to remove the headlight cover,headlight door and the headlamp holder/bucket.

There is a chrome headlight ring, holds the headlamp in, and that ring has two attachment points on the headlamp holder/bucket.  Those screws that attach the chrome ring to the headlamp holder come into contact with a screw on the horizontal and vertical adjusters.  So the pop was due to the adjuster screw no longer being able to move and the plastic screw clip on the adjuster seperated, rendering the adjuster useless.

I checked the screw clearances with the driver side and the driver side radiator grille is a 68 grille.  And there is between 1/8" to 3/16" space between the screws.  I also checked the other spare grilles that I have and the 68's have the clearance and the 67's have minimal to no clearance....

Passenger side grille assembly - low beam horizontal adjuster "popped" while making adjustments.  Red arrow indicates new adjuster that failed.  Blue arrow indicates the cause of the failure.

The stock screw location is "stripped".  So I used a replacement screw and used a locknut to secure the adjuster.


Saturday, September 8, 2018

8 Sept 2018 - headlight adjustments

Although I have installed the grille mod, I did not yet setup the headlights for night driving.  Tomorrow, the plan is to get that done.

8 Sept 2018 - engine temp sensor installation


Today I installed the original style temperature sensor.

I drained about 4 quarts of coolant so that when I replaced the temp sensor at the intake manifold, I wouldnt have coolant everywhere.

The drained coolant looked pretty good for two years.

After installing the sensor, I filled up the radiator and overflow tank with Prestone 50/50 coolant.  That took about 30 minutes or so to burp the cooling system and get the proper level.  I will continue to monitor the coolant level.

Monday, September 3, 2018

3 Sept 2018 - headlight door grille mod

Here are a few more pics of the project...
Before the headlight door grille mod...

After the headlight door grille mod...


Sunday, September 2, 2018

2 Sept 2018 - headlight door grille mod

I finally was able to put both radiator grilles back together and install.  There may be a few adjustments that need to be made but for the moment, I like what I have done.  I still need to adjust the headlights for night driving.


Saturday, September 1, 2018

1 Sept 2018 - headlight grilles

While working on a mod to allow the headlights to function yet still have the grille doors "closed" has been a slow process.  I have both outer sections of the radiator grilles removed to allow working on the mod.

The mod in a nutshell is basically this; seperate the headlight door hinge from the headlight door and seperate the grille work from the headlight door and then mount the grille work to the headlight door hinge(both sides).

That is not too bad to do, the hard part is to be able to secure the headlight door hinge/grille work and then still be able to adjust the high and low headlights as needed.

I have a couple of ideas on how to do that and I am in the process of obtaining parts to test those ideas.  While I wait for parts to arrive I have been cleaning up, removing rust from various areas of the passenger and driver side radiator grille assemblies.


I was able to install the lower heim joints and bolts that will allow adjustment of the headlight door hinge/grille work assembly.  As soon as I pick up the 1/4-28 threaded rods and cut to fit, I should be able to connect the lower heim joint to the upper heim joint which attaches to the headlight door hinge/grille work assembly.


driver side: heim joint mounted and spacers to prevent side to side movement

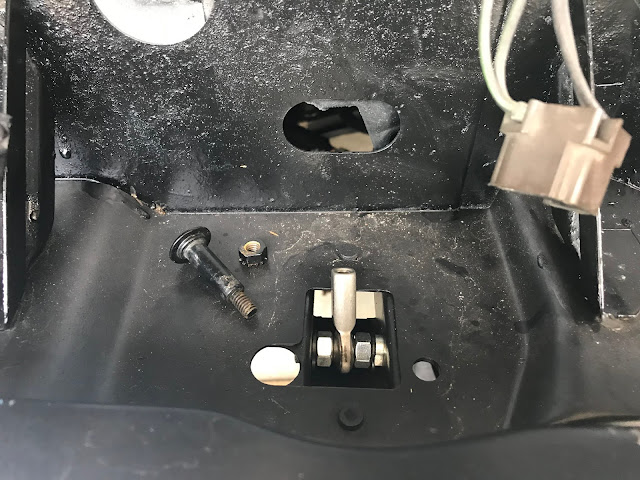
passenger side: the painted bolt is used to mount the vacuume motor.  The heim joint is mounted to a bolt with the spacers you see so that the movement from side to side is minimized.


Here is the headlight door hinge with both spring mounts removed